Connect Claude Desktop to Data Platform
This guide explains how to connect Claude Desktop to a Zoovu MCP server. You will need:
- Claude Desktop installed
- Data Platform MCP Server URL
- Data Platform API Key
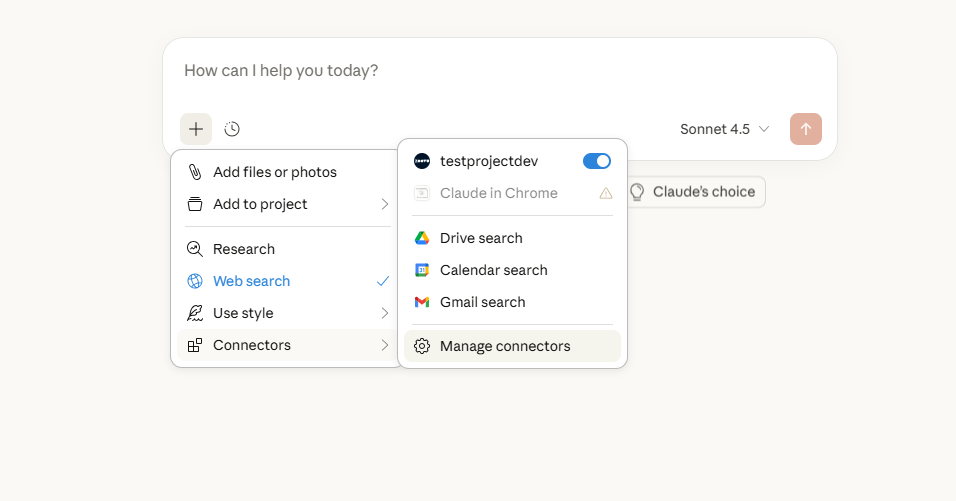
Step 1: Open connector settings in Claude
- Open Claude Desktop.
- Open any chat (or start a new one).
- Click the
+button next to the message input. - Select
Connectors>Manage connectors. - Click
Add custom connector.
Step 2: Add the Zoovu MCP server
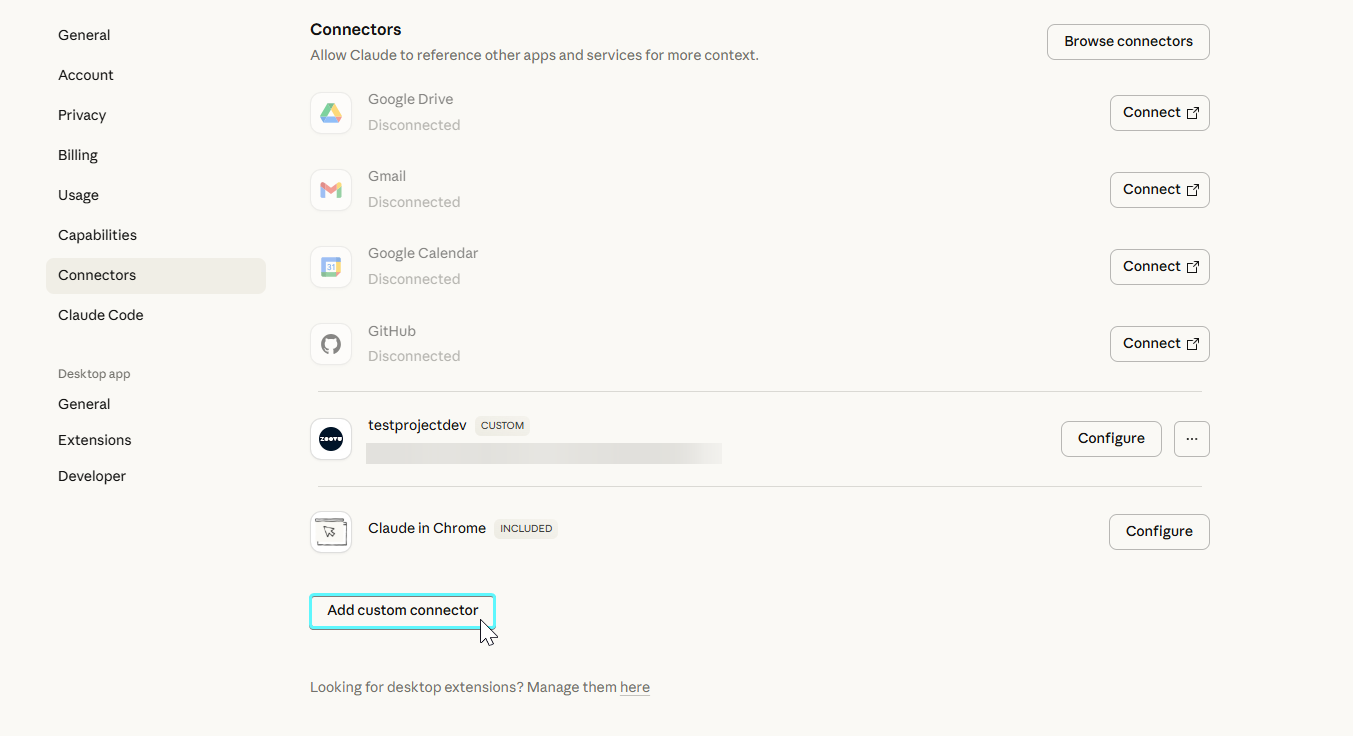
In the Add custom connector dialog:
- Enter a name for the project
- Paste the MCP server URL for your Zoovu data platform project (see details below).
- Click
Add. The connector will now appear in the list as a Custom connector.
Remote MCP Server URL
Create a configuration in the MCP section of Data Platform. Once you have saved a configuration, you can copy the MCP server URL from the three-dot menu.
Data Platform MCP server urls follow this pattern:
https://mcp.data.zoovu.com/mcp/{projectId}/{apiKey}?configId={configId}
projectId: your Data Platform project ID (e.g.,11222)apiKey: Data Platform API key (e.g.,a1a1a1a1a1a1a1a1a1a1a1a1a1)configId: config ID (e.g.,123)
Step 3: Enable the connector
- In the Connectors list, find your newly added Zoovu connector.
- Make sure the toggle is enabled.
- Click
Configureif you need to review or update the URL.
Alternative setup: manual MCP configuration (advanced)
This is an older, manual setup method for connecting Claude Desktop to a Zoovu MCP server.
Use this approach only if:
- you cannot use the built-in custom connector UI in Claude Desktop
- you are working in a restricted or automated environment
- you need full control over how the MCP server is started
- you are troubleshooting or maintaining an existing legacy setup
For most users, the custom connector flow in the Claude UI is recommended. It is simpler and easier to manage.
You will need:
- Claude Desktop installed
- Node.js with
npx - Data Platform MCP Server URL
- Data Platform API Key
Configure Claude Desktop
Claude Desktop loads MCP servers from a JSON config file named claude_desktop_config.json.
Common file locations:
- Windows:
C:\Users\<YourUser>\AppData\Roaming\Claude\claude_desktop_config.json - macOS:
~/Library/Application Support/Claude/claude_desktop_config.json - Linux:
~/.config/Claude/claude_desktop_config.json
You can also open it from Claude Desktop via Settings > Developer. Then add a new MCP server entry.
Example:
{
  "mcpServers": {
    "ps-mcp-prod": {
      "command": "npx",
      "args": [
        "mcp-remote",
        "https://mcp.data.zoovu.com/mcp/YOUR_PROJECT_ID/YOUR_API_KEY?configId=YOUR_CONFIG_ID"
      ]
    }
  }
}
ps-mcp-prodis just a placeholder name for this server; you can change it.
Remote MCP Server URL
Create a configuration in the MCP section of Data Platform. Once you have saved a configuration, you can copy the MCP server URL from the three-dot menu.
Data Platform MCP server urls follow this pattern:
https://mcp.data.zoovu.com/mcp/{projectId}/{apiKey}?configId={configId}
projectId: your Data Platform project ID (e.g.,11222)apiKey: Data Platform API key (e.g.,a1a1a1a1a1a1a1a1a1a1a1a1a1)configId: config ID (e.g.,123)
Get an API key
Generate an API key in Data Platform > Project > API Keys:
https://data.zoovu.com/projects/api-keys?projectId=<your_project_id>
Apply the configuration
- Save
claude_desktop_config.json. - Restart Claude Desktop so it reloads MCP servers:
- Quit and reopen Claude Desktop, or
- Use “Restart servers” in Claude (if available).
- After restart, Claude should list and load the
ps-mcp-prodMCP server as a tool.